Tuesday, November 3, 2015

DIY Back Drop for Cake Smash

I was so excited to get a baby girl for my next cake smash. Her outfit was pink and gold so I thought I'd do something with streamers but with textures... So I added lace and pink pom pom yarn (which I purchased on clearance and knew it would come in handy!)

I used 2 different shades of pink streamers (even though the photo looks the same), lace, twine, & yarn. 

The lace was too wide so I cut that in half....


I just tied them to the twine...


Add some tissue fluff balls and balloons and you're set! Here's how I made the Smash Cake.


DIY Bunting is always an easy go-to for backdrops :)


Here's some more from the session... she's just so adorable!


Monday, October 19, 2015

DIY Floral Crown


I had a senior session coming up and I really wanted to make a floral crown. I've been wanting to make one for a long time but just haven't gotten around to it and usually a photo shoot will inspire me to actually start making it happen! I found tons of tutorials but mostly, I wanted to look at different photos to see what I liked best.

I grabbed a few things at first and ended up at Joann's for more floral stuff. Luckily all the fall items were 60% off (scored!). I already have the wires and wire cutter & floral tape. I had thicker wire to use for the base (i'm not sure how long I've had that). 

I measured my head and gave it another inch so it would fit once I place the flowers on. 

There were tips about laying your floral items out before assembling. Since I had no idea what I was doing, the photo is not everything I used.


My first attempt was a disaster. My 14 month old was with me and he was tearing up the place (I should know better) but I had to take him with me to my craft room. He keep grabbing the flowers from me. unraveling my floral wires, throwing things at me.... etc. What was suppose to be a quick project ended up being 30 minutes long and barely half way done.

When I finally had time to do it alone on the weekend, my creative juices were flowing better! I ended up making two different ones because I didn't know what my senior was wearing or if she'd even like it...

I started with my largest flower. I used floral wire to attach the flowers and then wrapped it with floral tape. 

As you can see, half way through, I just added leaves... it wasn't my original plan but I really like it this way once I was done. It was probably the best choice since the flowers were huge.


I was pretty happy with the results even though it looked huge on my head. I always thought I had a big head but I guess I don't. I was so worried but when I put it on Miss D's head, it was perfect! The best part was she like it and she looked so great in it too ;)

Success!


Another one I made using fall colors. This one wraps all the way around with flowers.


Thursday, September 17, 2015

DIY Shirt (Name Tag)

I recently made DIY bridal tanks for my friend's bridal shower (using freezer paper). I had Vinyl that I wanted to use to make a shirt for my son. I upgraded my Cricut Expression to the Explore. I haven't used it much but I LOVE IT! It was a birthday gift to myself ... and TODAY is actually my birthday! I took the day off. Had lunch with my husband (alone for once) and unloaded a few rounds at the shooting range. After picking up our oldest, I decided it was time to start on the shirt. I saw this tutorial online recently and have been dying to make one! 

I found a name tag on Design Space for $0.99 cents. Ugh hello!?! The whole point of me purchasing the Explore was so I can upload my own images! So, I searched online and found some random one and edited it in Photoshop so that it was the right file (for where it will cut). Here's the link to it (hope it works!). 

I had my son sign his name on a white piece of paper and also made that a digital file in Photoshop. I checked out a couple of tutorials online from PHLEARN & Jack Lewis (random search) on how to make an electronic signature.


I'm so happy with how it turned out! 

I used Design Space to create the design, cut it on the Cricut Explore (mirror image option) and ironed it onto a shirt I bought from Walmart for $2.

What I used: 

T-Shirt
Iron On Vinyl
Iron
Cricut Explore

What I did:

So... Once I got the files (signature and name tag) onto my computer, I uploaded it to Design Space. I followed the instructions on the vinyl...

Create design in Design Space. Mine was about 4x7 inches. His shirt is boy's 6-7. 

What I didn't know (only used this twice) is that you have to choose the "cut" option which is the scissors icon. When I uploaded the files, it was on print as default.


The liner (shiny) side is placed down on the Cricut mat. Set the Explore to Vinyl (love this option!). When cutting iron on vinyl, you need to check the "mirror image" option so it's the right side when you iron it on. 


Then you "weed" out any white parts you don't want to iron. 

Place vinyl side down on the shirt (shiny side/liner on top). 

Set iron to Linen/Cotton and turn OFF steam. 


Use another fabric between the vinyl and iron. Press for 25-30 seconds and turn around and do the same on the back.

Peel off the liner.

I'm still learning how to use this but I have no doubt that I will LOVE it.
I don't know why I still expect him to "stay still" when I ask HAHA


Looking at me through his binoculars.


He said he was a monkey... I'm not convinced. 


DIY Ladder Ball Stand


So hubby wanted a ladder ball game for our camp trips. He purchased some balls on clearance and since it seemed pretty easy to make the stands, I did. The total cost for the PVC pipes were about $17 at Home Depot. I've seen them made in slightly different sizes but most of them were 2 feet  wide and 1 foot in between each level. I just went off this tutorial. Below is what I used for 2 stands.

SUPPLIES:

5 - 10 foot 3/4" PVC pipes
12 Elbow Connectors 
12 "T" Connectors
PVC Cutter
Pen/Marker
Measuring Tape
Glue (if you plan to glue them together)
Spray Paint

DIRECTIONS:

Cut your PVC pipes in the following sizes

18 - 24 inch pieces (9 each stand)
12 - 12 inch pieces (6 each stand)


Mark your pipes and cut all the pieces. You'll ended up with an extra 24" piece.


My cute little helper. Okay, more like... destroyer! I sent his older brothers outside to play after dinner. So it's just me & him.


Put them together and you're done! Okay, I'm not done because I want to paint parts of it. 

I decided I don't want to glue them because we'll take them apart and put it in a bag to transport when we go camping.

When I finished them, little man thought it would be fun to push it around like a walker... I guess he's just practicing walking (on his knees!). Hopefully he'll master that soon!


Now, let's paint! When I searched, they were mostly primary colors - blue, yellow and red. I wanted to go with other colors ^_^ - Orange, Yellow and a lighter blue.

I was having some issues with wind blowing on my drop cloth and ruining the paint on the PVC... I didn't think this through and had to get the pipes off the ground using rocks. Guess we'll have color rock added back into our landscape!


Fun for my boys!


Friday, September 11, 2015

DIY Ice Pack & Cover

We spent the weekend in Tahoe at Sugar Pine Point for Labor Day weekend. Surprisingly, no one got seriously injured or cut, bruises, etc.... that's until we got home. While my oldest was chasing his brother around, the little one slipped and banged his head on the banister. It looked really bad but it didn't bleed (barely) and it looked more like it was dented... eventually it bounced back to it's original shape. I'm surprised that he wasn't crying as much as I would have!


Anyway, this is when I realized I need to make another ice pack... for the kids. I could use one too because I started my allergy shots a couple of months ago and on very low dosages but I keep having a reaction so they recommend using an ice pack to sooth the local reaction from the shots (ouch).


If you haven't made ice packs before, there's several ways to do it but years ago when I use to deal with plugged ducts from nursing, the lactation nurse recommended using rubbing alcohol and water. This was pre-Pinterest! 

All you need is 1 part rubbing alcohol and 3 parts water.  Put this mixture in a Ziploc bag. I don't recommend using thin generic zip bags. I like the thicker Ziploc brand especially if the closure has two "zippers". For fun, you can add food coloring for the kiddos. Let them help because my little boys love to help me with everything. Wait, they don't always like to help clean! So, I take that back, they don't love to help with everything.


And what fun way to use the ice pack than to make a soft cover for it using flannel fabric.I purchased tons of fabric while I was pregnant. I couldn't resist the 70% off sales they have for flannel from time to time at JoAnn's Fabric. It ends up being less than $2 a yard sometimes!

Materials:

Fabric (Something soft)
Scissors or fabric cutter
Sewing Machine 
Pins
Coordinating thread

Instructions:

My quart Ziploc measured approx. 7x8 inches. One end will need to be slightly longer because it will fold over (you'll see).

Cut your fabric to size. I cut mine 9x18 inches.


Fold edges in about 1/4 inches and pin. Then sew around.


Fold one end up leaving 1.5 inches. Fold the flap down and pin edges.


Sew the two sides. The ice pack is in there (it's hard to tell). 

Just so we're clear. I'm no expert in sewing... my lines are never straight and most of the time, I have no idea what I'm doing. I make these for my personal use and so it's okay if they're imperfect :)


Saturday, August 29, 2015

Personalized Bridal Tanks

I've been wanting to print on clothing for awhile. I wanted to try the freezer paper method and this was a good opportunity for me to try. My friend is getting married and we planned a shower for her. We had brunch and went wine tasting... 

Back when I got married, we partied. Now, most of us have little children and hardly have time to escape the house. We kept the event local and part day. I had planned to pump in the parking lot but ended up not having to... not that it would be the first time!

Anyway, the wedding theme is Nautical (is that what it's called?)... so I wanted to make personalized tanks for the girls. My best friend came to help with her Cricut Expression so that we have 2 to work with... well, I haven't used mine in a long time and I was not having the best of luck not to mention, my little boys kept interrupting. Things didn't work out... 

Instead of going to bed like I should have, I decided to google about the Cricut Explore Air (latest model). I just love the idea of having your own fonts and art available to use. It didn't take long for me to run to the nearest JoAnn's during lunch the next day to buy one! My justification was that it's a birthday gift for myself even though my birthday isn't for another 2 weeks :)

I was limited with time so I rushed through this project!

There are tons of tutorials that use freezer paper without a cutting machine. You simply print your design on regular paper, trace it onto freezer paper and then cut it with a craft cutter. 

For some reason, I purchased the Glitter (far right in photo) fabric paint thinking it's opaque. It's not. It's clear. Even though the bottle was white. UGH.  So I was only able to paint the bride's tank since the blue paint was okay. 


After I ironed the freezer paper to all the tanks, I painted the white tank and waited until the next day to finish the rest.


I had 10 tanks to make and it was recycle day soooo... hubby threw out all the cardboard I wanted to use under the layer of the tank so that the paint doesn't bleed through to the back. I used paper which kinda stuck to the shirt when I pulled off but it was fine for what I needed it for. Oh, do you see the sailor hat in the middle of the photo? I almost forgot that I had to make something out of that too! haha... don't worry, I eventually got to it.


I poured the paint on a little paper plate and used a sponge brush to apply the paint on the freezer paper stencils. I placed paper inside the shirt to prevent bleeding. I think cardboard would work better or even freezer paper on the other side...


After it dried a little, I went over it with another coat. I think it could have used one more coat but I really ran out of time because it needs 4 hours to dry flat. The kids will be home and I need it off my dining table... so two coats, it is!


I peeled off the stencil and admired it for a little bit and thinking of ways to improve it next time. Well, I plan to make personalized tops for my boys! 


So... with the sailor hat. I printed a smaller stencil of the same anchor and painted that blue. I put a gem on the top of the anchor. Then I glued lace around the hat using a hot glue gun. Using white tulle, I hot glued those suckers to the back and glued 3 flowers over it. Viola!


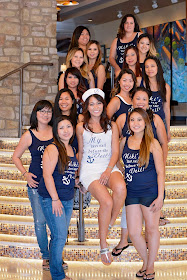
And here we are wearing them!


Okay, that wasn't the whole group. Some of us wore dresses. Aren't they cute too? All navy too!