Okay, I have been wanting to do this for a long time. I found several tutorials on Pinterest and all of them used Mod Podge. I waited for a day for them to dry and they still didn't look right. I ended up peeling them off the pebbles and gluing it with E6000 since I was already going to use that to glue the magnets to pebbles. I'm so glad I decided to do this because it looks so much better!
What I used:
Gem Accents ($1 from the Dollar Tree)
E6000
Magnets (I would choose a size that is slightly smaller than your pebble)
Photos (or Scrapbook paper for fun designs!)
What I did:
Okay, as I mentioned before, I mod podged the pebbles to the photos first. Then after a day, I cut around the photos and decided I didn't like the way it looks. I ripped it off and glued it back on with just a tiny little dab of E6000. You don't need much. Once you press down, it covers the whole photo. As you can see in the below photo, the Mod Podge wasn't smooth.
When I was at Walmart, the smallest magnets they had were slightly bigger than my pebbles. These were self adhesive magnets. If you get regular magnets, use the E6000 to glue the magnet to the pebbles.
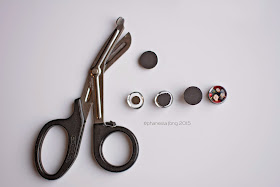
I attached a few and really didn't like the way it looked. I had just one little magnet on my fridge that I used on one of the pebbles. It looks nicer because you can't see the magnet from the front. I debated whether or not I wanted to order them from eBay or Amazon but I have no patience to wait for that.... then I remembered we had a pair of scissors that can cut through the magnets! So that's what I did. Although it's not pretty, it will do! haha
From left to right:
- A small magnet I found on my frig that was perfect!
- I cut the magnet so that it's smaller than the pebble. It's ugly but you can't see it from the front!
- The magnet (uncut) slightly bigger than the pebble.
- If you look closely, you can see the magnet from the front on the last pebble.


