Saturday, April 12, 2014

DIY eye patch for glasses

I recently found out I have Bell's Palsy. You can read about my story here. Since my eye isn't closing all the way, I needed an eye patch especially to protect it from the wind and dust. I bought a couple from the local drug store but it was very uncomfortable and bulky. This meant that I couldn't put my prescription glasses over the eye patch. 

I knew somewhere on Pinterest, I could find a tutorial and I did here. I made mine slightly bigger because the tutorial was made for a child. 

MATERIALS: 
  • 3 small pieces of cloth - I used felt, canvas & pretty calico prints. 
  • Matching thread
  • Scissors
  • Pins
  • Binding
DIRECTIONS:
  • Draw out an almost tear drop/oval shape (see picture). Make sure to cut the 1 inch triangle shapes. I just printed the photo from Amanda's blog and used that making sure it was 5 inches long and 4 inches wide (Ignore the measurements on my picture. Those were the original measurements from Amanda). I pinned the template to my fabric (all 3 pieces) and cut them out at once. 
  • Trace the triangles on the piece that will be on your eye's side. 

Look at all the pretty prints. 

  • I found hair ties that I didn't want and cut those to use as the elastic bands. This will help your glasses hold the patches. 
  • Sew the 3 pieces of fabric together. 
  • Cut the elastic to fit on sides of patch. Pin and sew edges (You can do this at the same time as sewing your 3 pieces together).
  1. Pinch where the triangles were and sew. This makes a bump (cone shape?) so that it's not flat on your eyes. 
  • You can stop here or add binding. I really didn't want to deal with binding but it just looked unfinished. 

Viola! It's not perfect but it will do!


Okay so at first, I thought I could get away with using only two pieces of fabric which was a little flimsy and see through so when I made the 2nd one, I added the 3rd fabric which was much better! 

Why am I not smiling? Well, given that half my face won't move, I will definitely look like a pirate. I love the blue and yellow with the stars! If I have to wear a patch, I might as well make it the way I like it. 


Monday, April 7, 2014

More Bunting!

I ♥ bunting. There is so much you can do with different paper, fabric, shapes, sizes... the possibilities are endless! I have been using a lot of triangle buntings so I decided to go with another shape for these.
 

SUPPLIES:

  • 10 Paper of choice 6 x 4 1/2
  • Scissors
  • Hole punch
  • Ribbons
  • Ruler 

INSTRUCTIONS:
  •  Cut your paper to measure 6x4.5 (or whatever size you like. I used spring/Easter colors as I'm using these for spring photos. My cardstock was 12x12. I ended up with extra paper that I used to make pinwheels. See the tutorial here

  •  Measure 4 inches down and 2 1/4 (half of 4.5) inches from sides and mark your paper.  
 
  • Draw a line from the mark to each corner & cut along lines.  


  •  Using the first piece as a template, place it over the remaining pieces and draw your line on the BACK of the paper (so you don't have to measure again!) 
 
  • Punch holes on each of the corners on top (for ribbons to thread through)


  •  Thread ribbons through holes from front to back. 

 If you're interested in the decorative DIY Pinwheels, please click here.


Sunday, April 6, 2014

DIY pinwheels (decorative)

Pinwheels... It reminds me of my childhood. I wanted to make a few for a photo session with my boys. These are only decorative as they don't spin. I used left over card stock from another project. Click here to check it out!


SUPPLIES:
  • Square paper (cardstock) I used 6x6
  • Sticks/dowels (I used chopsticks)
  • Pins
  • Scissors
  • Hot glue
DIRECTIONS:
  • Cut your paper into square pieces 
  • Cut from all four corners into center (do not cut through!)- you can measure and use a pencil to mark your paper but I didn't want marks on my pinwheels. 
  • Punch holes in center and corners 

  • Using a pin, hold all corners together in center. 

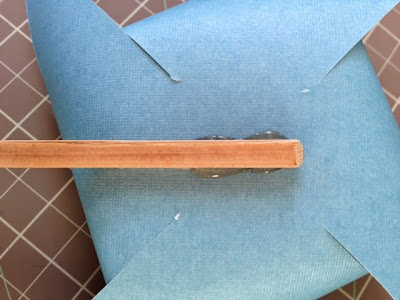
  • Apply hot glue to stick and attached to back of pinwheel

And they match my bunting!