Monday, September 29, 2014

DIY Super Hero Mask & Cape

I found the tutorial for these cute super hero masks & capes on Cutesy Crafts who I subscribe to because Jessica is so talented! I made a couple for my boys last year around Halloween... I'm going to need another for my newest addition who's almost 2 months old :)


DIY Newborn Hat & Pant Set

I love this sweater. I love this color. I bought it at Target on clearance. I buy a lot of clearance items. Why not? Especially when they don't last long. Anyway, my husband pointed out that I had a hole in it... me so sad :(


The upside is, I was able to make some clothes for my baby's next photo shoot. I know my title says "newborn" however I made it to fit him & he's a small 2 month old (in a week).

For the hats, I pulled the sleeves over his head and they fit nicely so I was able to get 2 hats from the sleeves.

For the first one, I cut it right from the armpit area and tied two knots on top. No Sewing required! 


It still looked boring so I found a yellow T-Shirt I used for my son's Wolverine super hero cape & mask project. I cut a little square from the fabric. I also cut a little square of burlap removing some pieces off the edge. I decided to use the button from the sweater and the same color thread (brown) to attach it.


For the other hat, I cut it to the length I needed, turned it inside out and sewed a straight hem across. I actually forgot to move the original seam to the back of the hat before sewing. Luckily I cut it a little longer and was able to re do it! whew!


Turn the hat right side out. Then I cut a heart shape piece from the same yellow fabric & used the same thread to stitch around the heart. Cut a couple of pieces from the yellow fabric and tie it on the top corners to make little "ears".


Aren't they adorable?


For the pants, I used my baby's pants as a template. I cut the back part of the sweater. Sew the pieces leaving the bottom of the legs raw (I kinda like it like that). Added a drawstring from the same yellow fabric and I'm done!


Monday, September 22, 2014

Updated Wood Chair

I bought a cheap dining set from Ikea waaaaay back (I can't remember how long ago). I gave it to my mom to use as a desk because it's rather small for my new house. I kept one chair (it came with a set of 4). I wanted to paint it teal and use it as a photography prop. I think I will be using it at my computer desk just so I'm not having to find somewhere to store it. 


I actually started this while pregnant but never finished. It sat in the shed for a couple of months. 

Since we recently updated my night stands, I figured I might as well finish the chair. 

My awesome husband lightly sanded the surfaces. 


These are the spray paints I'll be using:


I used the Krylon Primer this time (lesson learned last time!
I cheated by skipping the primer and wish I hadn't).


I used the Rust-Oleum Satin Lagoon color. There was a little breeze so I had to place rocks on the plastic to prevent it from sticking it to the chair...
(Remove hardware first if you don't want to paint over them!)


I finished it off with Krylon Matte Finish.


Updated Lamp Shades


I've been on a mission to update my master bedroom.. including the DIY Headboard, Nightstands and now I thought I'd update my old orange Ikea lamps that have been sitting in my garage.


I thought about purchasing different shades to replace the orange ones but I just couldn't find one I liked. 

I went to Walmart to find fabric so I can just cover it up. I also wanted to add fabric rosettes because I'm a girl and flowers are pretty :)

You'll need to trace the lamp shade first. I had this bright large pink poster paper.


Then lay it on your fabric and cut leaving 1 inch around to fold over.


Using spray adhesive, spray the fabric and lay the shades on top. Carefully attach pulling taut (having someone help is a good idea) to avoiding bubbles.


Fold fabric over edges of lamp.


Using the same fabric cut 1 - 1.5 inches on the edge and rip it. Ripping it gives it that pretty frayed look. I also used teal fabric to add a pop of color to the shades.


Knot one end and start twisting and gluing using fabric glue. Keep twisting and gluing as you go.


Attach flowers to shades using fabric glue.
NOTE: My lights will appear orange since the inside shade (original) is orange but I like the mood it sets :)


Wednesday, September 17, 2014

Updated Nightstand


Several years ago, my mother in law bought a new bedroom set. She asked if we wanted her old set. Since we didn't have one, we took it. It's not really my style and I'm not a fan of wood colors, stained or not....

Many, many ages ago as a child, I thought that when I was old enough to live on my own, my home would be really neat and colorful and would look like it came out of the pages of a magazine... Silly me. I didn't realize I had to live with someone else (hubby) and kids... well, there's no "neat" with kids! 

When I first moved out, I moved into a small apartment with my husband (boyfriend at the time). We didn't have money to buy things which meant we took hand-me-downs. And don't get me wrong, I love hand-me-downs but I also love things that match... but nothing matched. Welcome to my reality. haha


Back to the bed set. I got tired of the headboard because when we started having kids, we would take the frame off to lower the bed (to avoid falls for my babies). We never put the headboard back.

Recently, my husband helped make this DIY Headboard. I'm so happy with it, I want to make at least one of our rooms look better. :)


Now that I'm on maternity leave with my 3rd baby boy... time to start doing something else before I run out of time especially since hubby is on leave too. I figured we would start with something small... the nightstands.


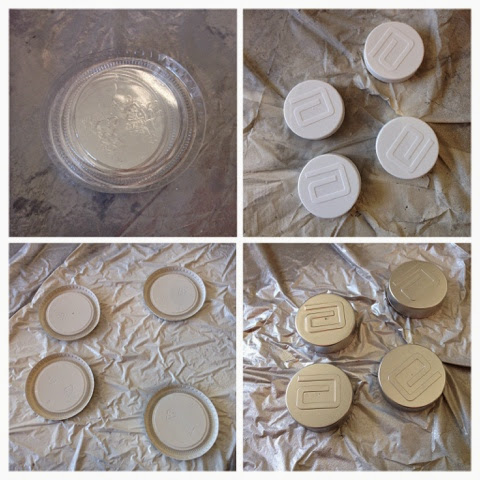
We decided to use spray paint for this project... I couldn't decide between so many colors I want to use! I went with white. Hubby came back with Heirloom White. I'm not too picky.


While my husband was sanding the nightstands, I removed the hardware. I hated these handles. It's the first thing I see and I cringe. Why? I don't know. I just don't like them... at all!


I won't be sad to see the handles go...
My kids would tie balloons to the handles. That's what those things are... lol


A little light sanding...


My little man helping with wiping the dust off.


After the first coat of paint, we felt it wasn't going to work out. So we bought flat white paint and painted over the spray paint. We did the same with the other nightstand so that they matched. I will probably use a primer first next time. I know you're supposed to use it for wood but we were trying to cheat. And I prefer spray paint too. 

Once the paint dried (the next day), I sanded the edges to give it that distressed old look.


After I cleaned off the dust, a couple of coats of matte clear spray paint was applied to the nightstands.


I haven't made it to the store for the hardware so I figured I'd paint the old ones (that I hate so much) and see how that works. I was planning to throw it away anyway. I spray painted it plain flat black (whatever I found in my husband's stash). 


It's not perfect but I'm happy with the results!


I even secretly love the handles! shhhhh! Now, I need to update my lamps! Another project? ;)
By the way, today is my birthday and I couldn't be happier with these as a "gift"!


Monday, September 15, 2014

DIY Cardboard Stove & Oven


My son loves to cook. For the longest time he would use a helmet (from his tool set toys) and lego blocks to "cook". He's gotten a BBQ Grill and cooking set before but he always went back to playing with his helmet and blocks...

I got the idea from marthastewart.com and decided to make one for my boy.

MATERIALS:

Cardboard box (I have tons of diaper boxes)
Scrap Cardboard
Duct Tape
Paint brush sponge (handle ONLY)
Spray Paint
Condiment lids (5)
Bottle caps (5)
Paper fasteners/brads (5)
Hole puncher
Printable labels (from marthastewart.com)
Box Cutter
Scissors
Hot Glue Strong Glue (Hot glue was okay for my 4 year old but my 19 month old tore it apart with hot glue. I re-glued it with E6000)
4 CDs
Permanent Marker
Plastic sheet protector
Double sided tape
Plastic hooks

INSTRUCTIONS:


Once I found the size box I wanted, I cut out the door for the oven.


I flipped one of the tabs up and duct taped the top portion for the stove (there was a gap I had to cover up).


Cut a square out for the window of the oven.


I decided to cut another piece of cardboard to stabilize the part that will hold the knobs. It will be on the back so I don't care what it looks like. :)


Spray paint the condiment lids and bottle caps. I spray painted the knobs silver (like the stove) and the condiment lids white.


Punch holes in the cardboard and lids. Attach them using paper fasteners (brads). It's okay if it's not the same color. It will be covered up.


Hot glue the bottle caps to the condiment lids. 

Print the templates (see link above) and attach it to the bottle caps as knobs. I attached the oven knob right above the oven because I didn't have room on top.


Cut your plastic sheet protector to size and tape it to the inside of the oven door using double sided tape.


Hot glue the CD's on top, shiny side up & draw swirls (I'm terrible at that) using a permanent marker.


Cut a piece of cardboard to size and duct tape it to the inside of the oven as a shelf/oven rack.


Using the handle of sponge brush, I spray painted the rod silver and hot glued it to the oven door.


I bought little hooks and attached it to the sides for hanging cooking utensils/pan, etc. 


He was so excited to use it. I don't think the paint even dried yet!