
I've always wanted a soft comfy headboard. I really like the look of it and it really looks nice in photos! I've been hesitant to make one because of the intimidation of having to cut wood and staple things... etc. Then a friend sent me the link to this tutorial & it uses insulating foam boards (very lightweight) so no wood cutting is required! I got pretty excited and went out to buy most of the supplies... I love that I could do this project being 32 weeks pregnant because there is no heavy lifting! I don't like to rely on others. When I want something done, I want it done yesterday.
BUT then... my husband with all his opinions. We were at the hardware store looking at the foam boards (about $10 for 1 in thick 4x8 piece). He started to think that the foam won't hold the staples. He said it might work at first but would eventually fall off especially with the wear and tear from the kids on my bed... that got me thinking. Maybe it's not sturdy enough for me. :(
He suggested MDF or plywood... something of that nature. I was sad because as much as I love my husband, he's not as excited about my projects as he is about his own... but with something that heavy, I will need his help and it's summer. We've been in the 100 degree heat lately. And did I mention I'm impatient and don't like to wait for him to do things for me?
I gave in because he promised to help. I think it had a little (or a lot) to do with all the new tools he found on clearance at the hardware store just a week before ;) He was pretty excited about that!
So wood it is!

So instead, I decided to go with this tutorial I had pinned on Pinterest a few weeks before. I love everything about what she did with hers. Let's say my headboard looks almost just like hers but with different supplies (I had already bought things for the other tutorial).
The wood we bought was just about the same price as the foam insulating board (but a lot heavier).
The whole project cost about $70-$80
SUPPLIES:
- 4x6 OSB (Oriented Strand Board) Wood $11 - It came in a 4x8 piece, cut down to 6 foot - 4x6
- Full size Foam Mattress Pad $12 - 50x72 inches
- Carpet Padding $25 - You could leave this out and save $25. Mine came in a 6x8 roll
- High Loft Batting $8 - Full size 81x96 inches. I didn't decided to use this until later. I'll tell you why soon.
- Fabric of your choice $11 - 2.5 Yards
- Spray Adhesive $7 - I had a can at home
- Button Covers 1 1/8 inches $1.50 - I bought 3 because I needed 7 and they were 3 in a pack
- Twine or String $1 - To attach the buttons
- Staple gun - My husband's new toy
- Cutting tool - If you plan to shape the headboard
- Painter's Plastic Drop Cloth $1 - Optional but my garage isn't exactly clean & it's only $1 at the Dollar Tree
DIRECTIONS:
Cut Board into desired shape.
![[headboard_shapes_490%255B6%255D.png]](https://blogger.googleusercontent.com/img/b/R29vZ2xl/AVvXsEi4OfLuT9dmA6X_vqnLcZqf9HdPic7AvUJXI9uByRnH83N8qrnlbjUHgDdAXxNUFvEtLmf6FpTGTDsnObT-Vy45iG9x5-Vy4Xqm-jwJAi3tVJhHwwE9KFNSjxMO86uGG7kdwFL-Psg8Y4s/s1600/headboard_shapes_490%25255B6%25255D.png)
I like the way she did hers in the tutorial with the Belgrave so that's what I attempted. I used a plate to trace the corners but my husband didn't like that idea so he used a pencil tied to a string and did a 7" radius from the corner.


Spray the board with adhesive spray per instructions (in a sweeping motion).


Attach the foam. I clamped mine but we ended up laying the next piece down on drop cloth (carpet padding) & laying it over on the carpet padding. This way the weight of the board is on top of the foam.

Cut down any foam sticking out.

Cut carpet padding around board leaving 4-5 inches around so you can wrap it over the board and staple.


Standing the board up, I draped the fabric over the board & noticed it was a little bumpy. I think the fabric was too thin and the carpet padding was too textured.
I decided to go buy some batting hoping it would help. It helped a little. On the tutorial, she mentioned using a Muslim fabric before using the final fabric. That probably would have been a good idea except I was ready to finish it and it didn't look bad to me anyway.

Before attaching the fabric, I measured the holes to drill for the buttons to tuft the headboard. For the life of me I couldn't figure out the measurements. After some back and forth with hubby, we figured it out.
The 3 holes on top are 18" from edge evenly spaced 18" across. They were 11" from the top of the board.
The 4 holes below it are 9" from the side edges but 18" between each hole. They are 22" from the top. So the holes are inbetween the above holes (if that makes sense).
After ironing the fabric, I laid the fabric on the drop cloth & placed the board on top. I trimmed around the edges (don't forget to save some for the buttons to tuft the headboard).


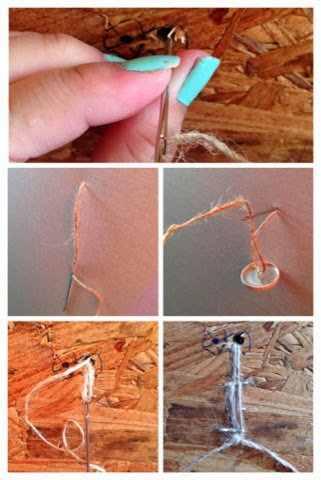
I felt so stupid because I couldn't figure out how to do the buttons. The instructions on the package was generic. I had to YouTube it! Haha after watching it, I was like "DUH!"


Now let's start the last step!

Using a large needle, thread the twine and insert it through the back to the front. Then thread it through the button and back through the same hole. Attached it with the stapler.

All done! My little helper!

I haven't made legs and I don't know that I will. For now, it's sitting on my box springs haha. I removed the frames off my bed because my baby sleeps with me and it's easier for him to get on and off. Since i'm due in Sept with another baby, I'm going to hold off on putting on the frames. If I do not make legs for the headboard, It will be hung on the wall... We'll see!

My son jumping in my bed.


I doubted my husband. If it weren't for him, I'd never get this done.
Thanks Babe!
Thanks Babe!
No comments:
Post a Comment